longeing · organizing

How to hang up a longe line

Here’s a technique taught to me by my first trainer, and one I’ve faithfully followed ever since. I actually cringe when I see longe lines just hung up loose, even if they are neatly coiled.

Step 1: Your longe line is a mess. No matter how careful I am while longeing, by the time my horse is back in his stall, this is always what my longe line looks like.

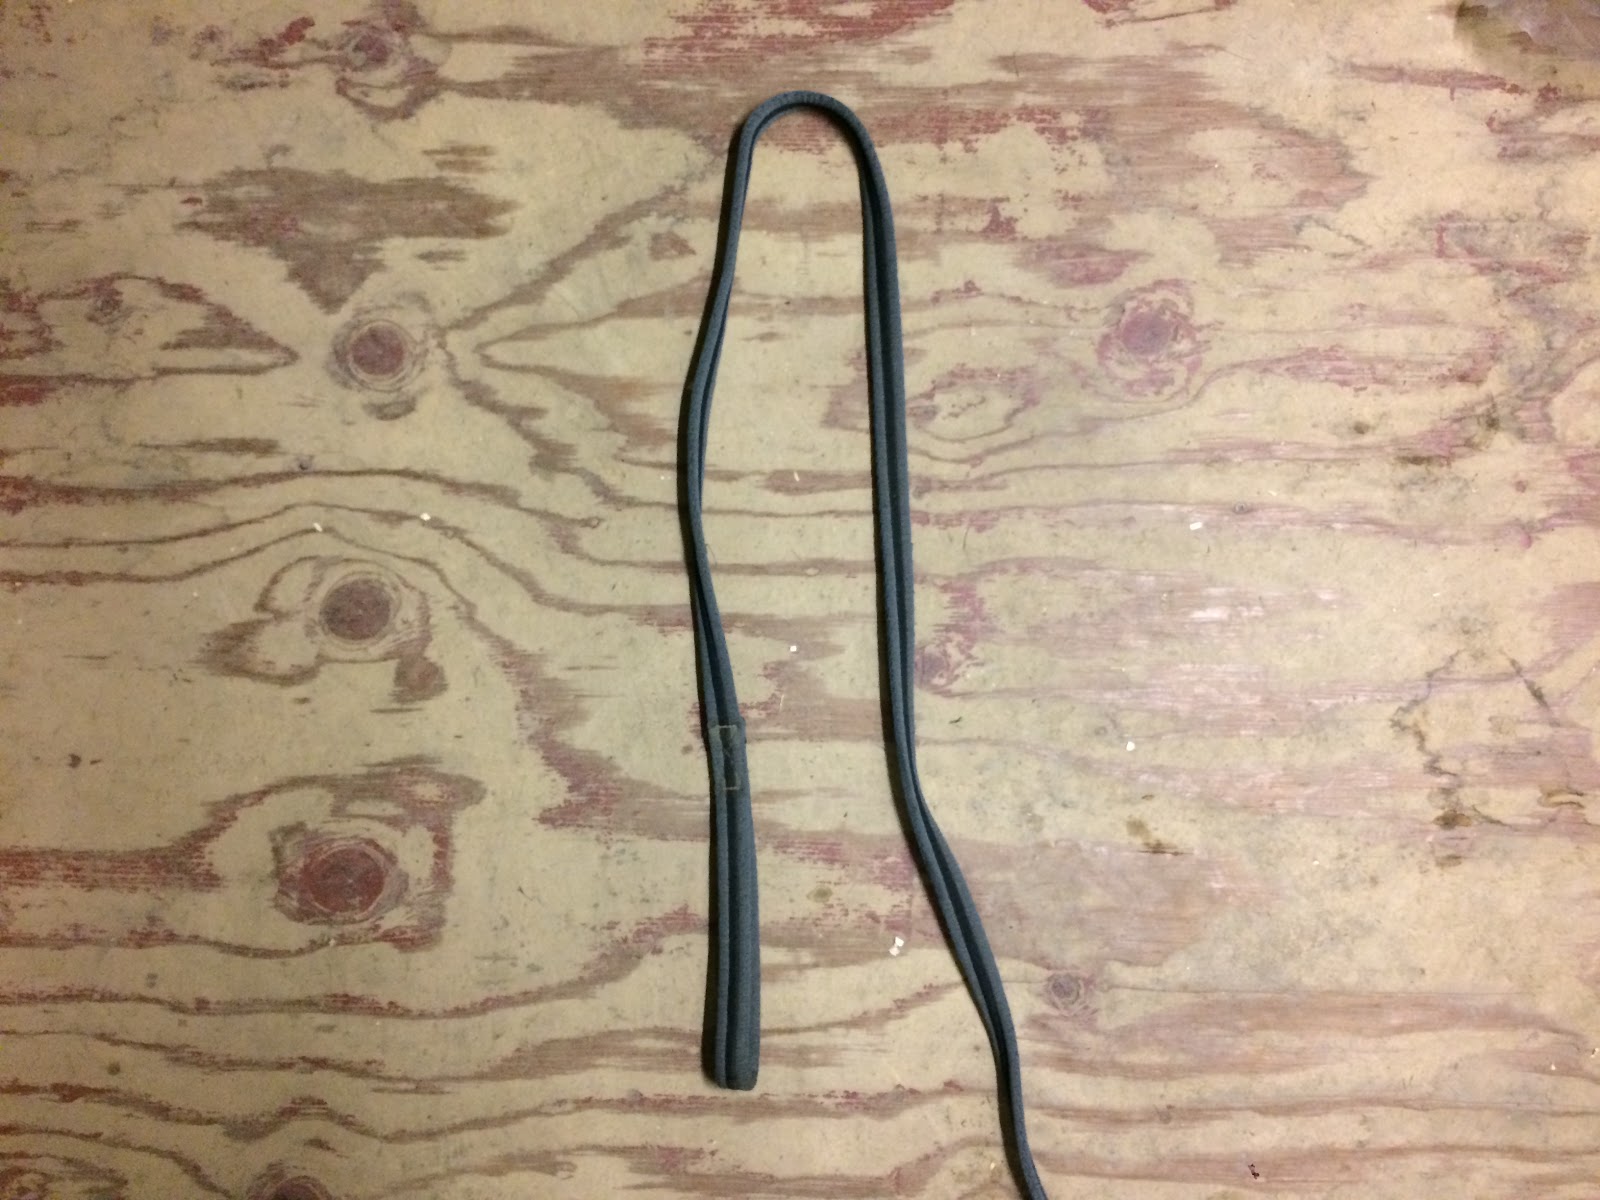
Step 2: Smooth the whole thing out, and fold it so the loop is down and at the bottom of a large coil; this is about two feet long, total.

Step 3: Coil the whole thing up, being careful to keep it flat and smooth. I do this step over my arm, and just laid it down on the tack room floor for photographic purposes. Leave the snap as a tail, about half as long as the coil itself. Once you get to know your longe line and have done this a million times you’ll get a sense of how long to make the coil to get the optimal tail length – but there’s really no wrong length as long as it’s shorter than the coil.

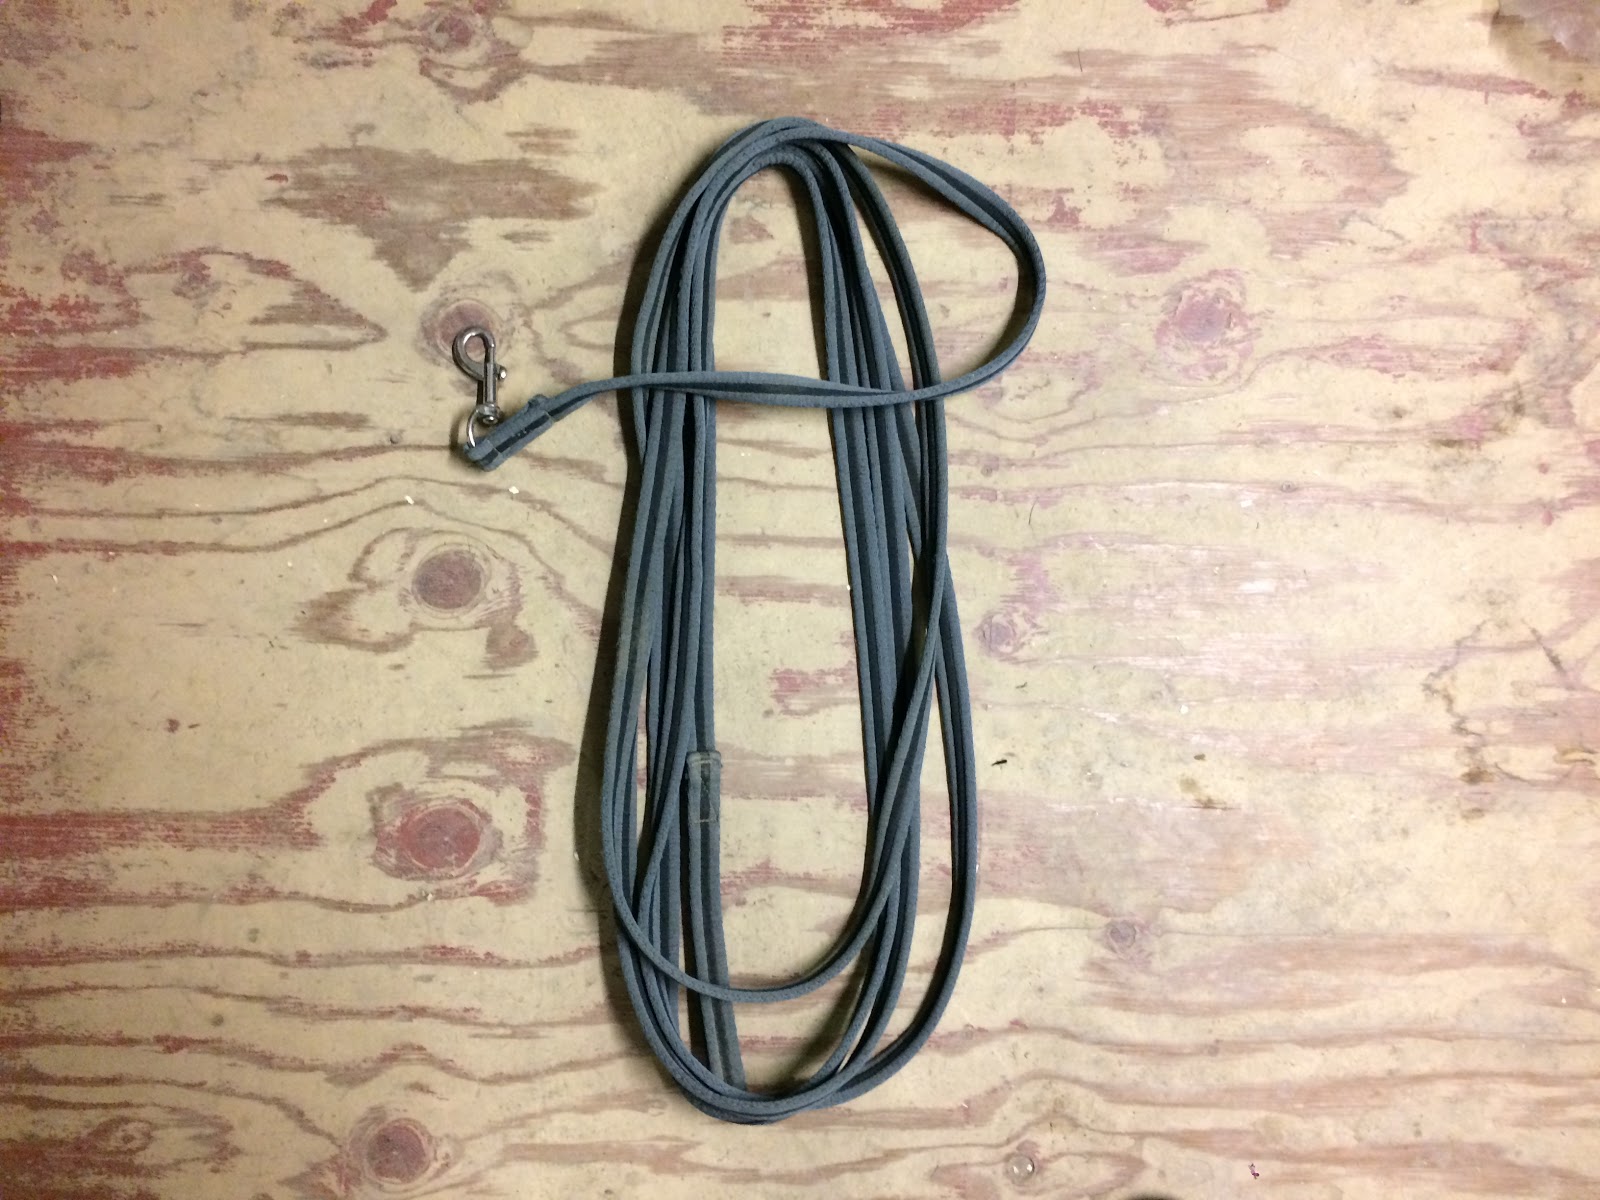
Step 4: Double the tail OVER the coil, a few inches from the top.

Step 5: Wrap the remaining tail around the top of the coil – snug but not tight, so that the coil stays together but not so tight that it’s distorting.

Step 6: When you’ve got a tail that’s a bit longer than the remaining height of the top of your coil, come around from the back and up and through the top. If I’d just gone through from the back, it wouldn’t be as secure: you want that last wrap around the side of the top before you go through.

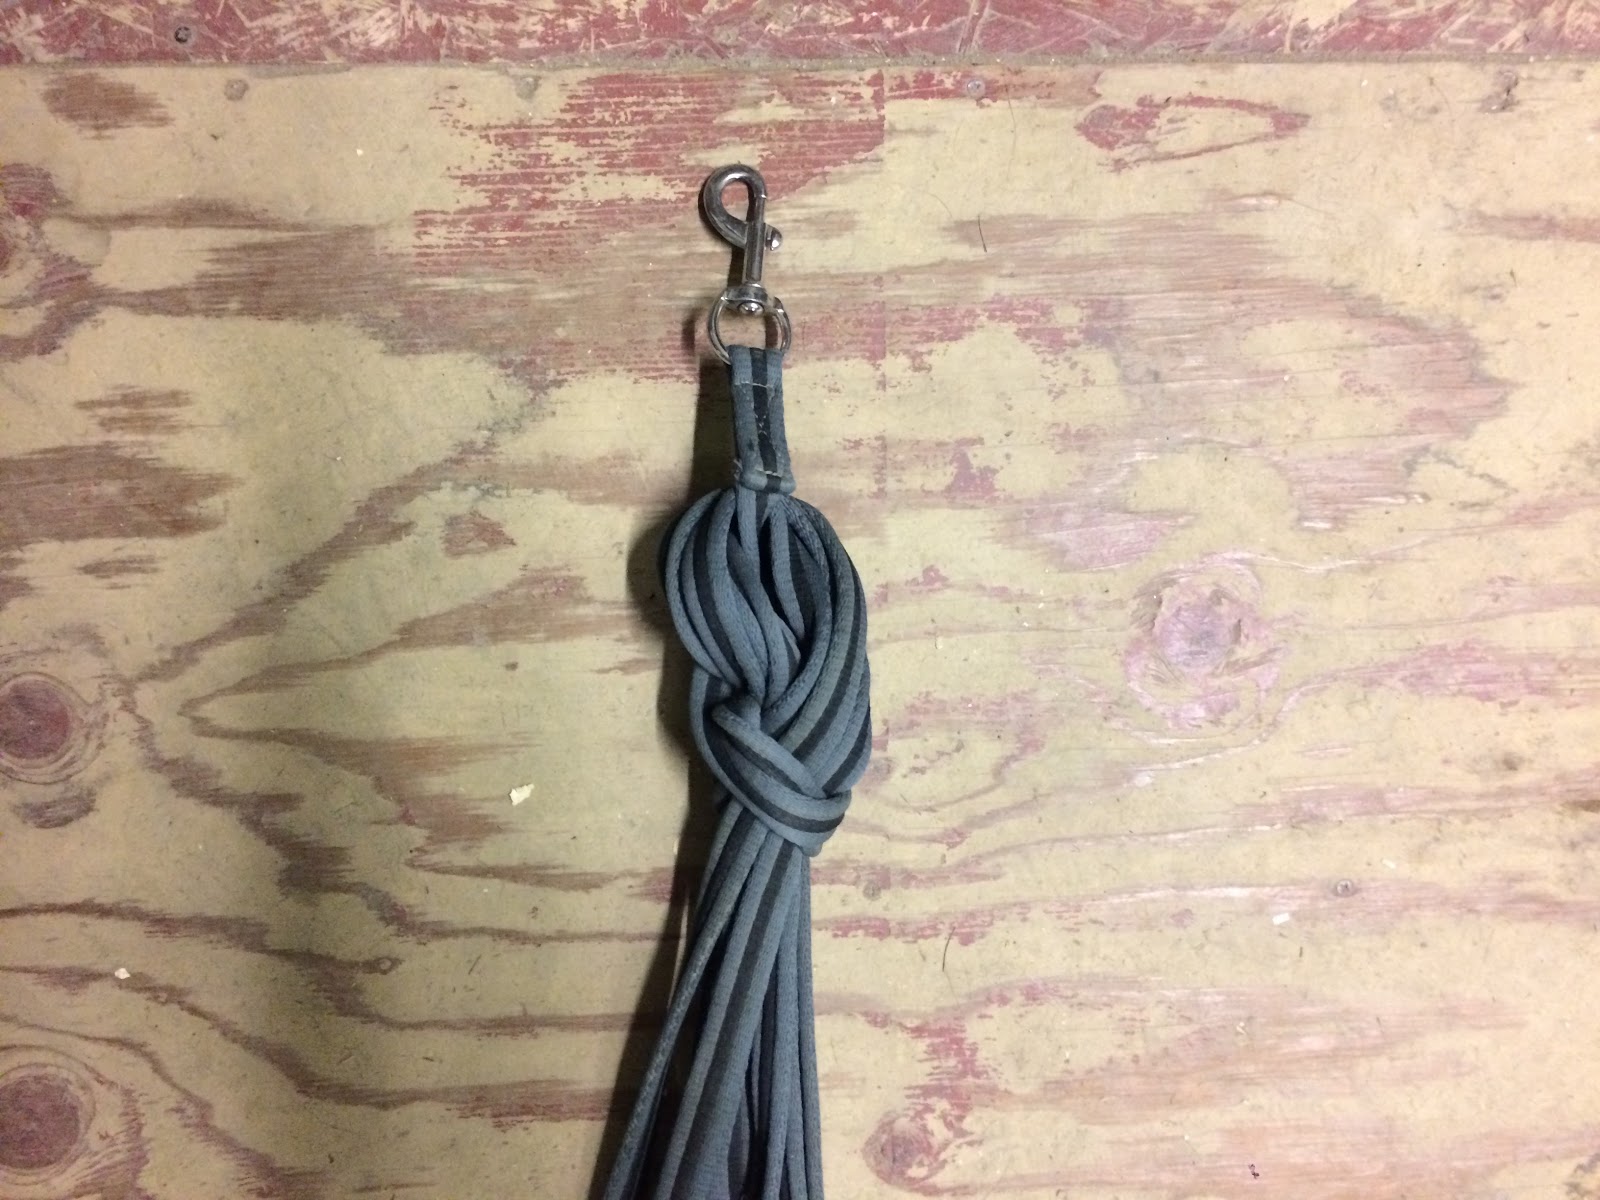
Step 7: Pull tight! You’ve basically made a knot, and the bulk of the longe line means that it’s tough to make it too tight. (Not impossible, though, especially with those nylon longe lines! So be careful.)

Step 8: Hang your longe line neatly from the snap. Gravity means the knot will stay.  You can also slide a hook through the knot itself if the hook is too thick for the snap; it’s not quite as secure, but it works.

Does anyone else hang their longe lines this way? any other techniques that leave a neat and secure longe line?

blog hop · organizing

Viva Carlos Blog Hop: Planner Post

I love this blog hop, because I love my planner. Here’s the original post.

I use a very, very specific kind of planner made by a company called Quo Vadis. It’s a style of planner I first fell in love with 12 year ago (eek) when I studied abroad in France in college.

Basically, you buy the outside cover and then keep buying refills for it. This cover is going on 5 years now, and is a bit beat up but for something that is handled basically constantly it’s doing greate. The stitching at the binding is worn and the cover is a bit ink-stained but other than that pretty good.
Size wise, it’s 5″ wide by 6 3/4″ tall. I measured. That makes it roughly the size of a paperback book; a bit wider and a bit shorter. It’s a great size to fit into my purse. 
Right when you open it up it has a good space for stashing things. When I took this picture, it was a pile of receipts I needed to file for work reimbursement. Underneath are my grocery list for the week, my financial planning for the year (using the 30 day system, I book out any purchases over say $15 so I don’t go on spending sprees), other notes, and a sticky note with my monthly budget as a reminder.
The inside, though, is what makes me really love this planner. 
Each page is one day. I have a to do list in the main text, with a box next to each item. X means it’s accomplished. X with a line to the right that ends in —> means it’s been forwarded to the future. X with a —| means it’s been canceled all together. As you can see, due to the empty squares, I’m not always perfect with this. Sometimes I’ll leave them on the days they’re originally scheduled for and flip back to catch up on previous lists.
The scheduling function above is mostly to keep track of personal appointments; work gets managed through a different system. The Priority box on the top is big overall stuff, like visitors coming, a big event day at work, something else that I need to remember for that day. The Notes section at the top keeps any number of things – books I want to read, plans for dinner, you name it. 
These are fairly light days because they’re weekdays. Days off get the whole page filled. I have learned that once I fill up the lines, I can’t make myself put anything more on the list for that day. I have to relax. Type A problems, I guess. I usually try to make items actionable steps; I’ll give myself a number of blog posts to write, or a specific task to accomplish, or in some cases a length of time, so something like “laundry 1 hour” or “email 1 hour” or “tidy bedroom 20 minutes” or “unpack 1 box books” so that I can check it off and move on.
One of my favorite parts of this planner is the bottom outside corner. You can see it on these pages. The corner tears off, so that you can just flip right to the current day. At the end of the year, it’s all torn off.
I’ve used this planner system consistently for about 8 years now. When the year is done, I write the year on the binding and file the old one. Since I keep so much on these pages, it can be fun to look back and track when I did things, or what I was doing. I try to take time in December to do a year in review; I skim back through, copy over any books that I’d noted or general things, and add them to my GoodReads list or other bigger lists or just ditch them.